Whirlpool Bottom Freezer Refrigerator Repair & Maintenance Guide
Learn how to troubleshoot and maintain a Whirlpool bottom freezer refrigerator with practical, step-by-step guidance, safety tips, and pro maintenance routines from How To Refrigerator.

Goal: Fix or diagnose a Whirlpool bottom freezer refrigerator. This guide walks homeowners through safe troubleshooting, common failure points, and practical steps to restore cooling, defrost drainage, and ice-maker operation. According to How To Refrigerator, bottom-freezer designs demand regular door-seal checks and periodic condenser cleaning to maintain performance. This quick answer is followed by a detailed, step-by-step body block with safety reminders and model-specific considerations.
Understanding Whirlpool Bottom Freezer Refrigerators
Whirlpool bottom freezer models place the fresh-food compartment above a pull-out freezer drawer, a layout that emphasizes easy access to everyday items while keeping frozen foods neatly organized. The cooling system relies on a compressor, condenser coils, evaporator, thermostat, and a defrost mechanism, with an ice-maker kit often connected to a dedicated water line. Because the freezer is at the bottom, airflow management and rear-coil cleanliness are especially important for consistent cooling across both compartments. For homeowners, understanding this configuration helps you spot problems quickly: if the fridge feels warm, the freezer frost is abnormal, or the ice maker stops producing ice, the root cause often involves airflow, defrost, or sealing issues. According to How To Refrigerator, regular inspection of the rear coils and drain path is a smart first step in any diagnostic.
Beyond core cooling hardware, Whirlpool models commonly offer adjustable shelves, humidity-controlled crispers, and door bins that can impede airflow if not positioned correctly. Routine maintenance—keeping door gaskets clean, ensuring clear airflow from vents, and verifying the drain pan is properly seated—extends service life. The How To Refrigerator team emphasizes that bottom-freezer configurations require attention to the rear heat sink area and the front-door airflow to maintain even temperatures across compartments.
How the Bottom Freezer Layout Impacts Cooling and Maintenance
The bottom-freezer design shifts cooling dynamics slightly compared with top-freezer or side-by-side models. Cold air naturally sinks, so keeping cold air distributed evenly depends on clean evaporator channels and unobstructed vents. Regular maintenance tasks, such as coil cleaning and gasket inspection, prevent minor issues from becoming major faults. When maintenance is neglected, a Whirlpool bottom freezer can experience frost buildup in the freezer, damp or warm airflow in the fresh-food compartment, and irregular temperature fluctuations. Homeowners should also consider load balance inside the refrigerator; overpacking shelves can restrict airflow and push the compressor to work harder, diminishing efficiency and potentially shortening component life. How To Refrigerator guidance suggests scheduling a quick monthly check of seals and vents as part of routine care.
In many cases, simple maintenance steps—like vacuuming dust from the condenser coils and wiping down the door gaskets—yield noticeable improvements in cooling consistency and energy use. Keeping the condenser coils visible and free of lint ensures efficient heat rejection, helping the compressor maintain steady operation even in warmer weather or during heavy usage periods.
Common Problems with Whirlpool Bottom Freezer Models
Whirlpool bottom freezers can exhibit several recurring issues that homeowners encounter. Not cooling or cold spots in the fridge, frost or ice buildup in the freezer beyond normal frost, consistent condensation on shelves, and an ice-maker that fails to produce ice are among the most frequent concerns. A damaged door gasket or misaligned doors can cause air leaks, leading to temperature imbalances. A dirty condenser coil or a faulty defrost drain can also disrupt the cooling cycle. Electrical problems—such as a malfunctioning thermostat, sensor, or control board—may manifest as inconsistent temperatures or the unit running continuously. When diagnosing, start with visible checks: seals, vents, and the exterior for obvious signs of air leaks, then progress to coil cleanliness and defrost drainage. The How To Refrigerator team notes that most failures stem from airflow restrictions, defrost system faults, or seal integrity rather than a single failed component.
For Whirlpool owners, recognizing model-specific configurations is helpful. Some units feature a bottom drawer with a tight seal that requires extra attention during cleaning, while others rely on rear access panels for service. Keeping a simple maintenance checklist can prevent many common issues from becoming emergencies.
Diagnostic Mindset: Where to Start
A structured diagnostic mindset helps you identify the root cause without unnecessary disassembly. Begin with safety: unplug the unit before opening panels or reaching into any electrical components. Next, check for obvious air leaks around doors and gaskets, then inspect the evaporator coil area for frost buildup. Listen for the compressor and fan operation; unusual noises can point to a failing fan motor or a failing compressor relay. Verify the defrost system is functioning by looking for frost-free operation in the freezer and clearing any defrost drain blockages. If the ice-maker is involved, inspect the water line for kinks or leaks and confirm a steady water supply. Throughout the process, document symptoms and the time of day they occur to identify patterns. How To Refrigerator suggests cross-checking with the model’s service manual for any Whirlpool-specific steps and precautions.
If you encounter electrical concerns or an undefined fault code, stop and seek professional help. Electrical work can be dangerous, and improper repairs may void warranties or cause damage. A clear, cautious approach saves time and reduces risk.
Defrost Drain and Frost Buildup: Clearing the Path
Defrost drain clogs are a frequent culprit behind frost in the freezer and moisture in the fridge. A blocked drain can cause water to back up into the freezer, leading to ice buildup and poor airflow. Start by locating the defrost drain at the back wall of the freezer interior and confirm a clear path to the drain hole. Flush the line with warm water or a gentle brushing tool to dislodge buildup. Avoid using harsh chemicals near food-contact areas. After clearing, pour a small amount of warm water into the drain to ensure it flows freely into the drain tube and pan. Reassemble, power on, and allow time for temperatures to stabilize. If frost reappears quickly, a defective defrost heater or thermostat could be the underlying issue and may require professional inspection.
For Whirlpool bottom freezers, a frequent frost drain blockage is a sign to inspect the defrost timer or control module as well. The goal is a consistent frost-free cycle that keeps both compartments within healthy ranges.
Condenser Coils and Airflow: Cleaning for Efficiency
Dusty condenser coils reduce heat dissipation efficiency and force the compressor to run longer, increasing wear and energy consumption. Locate the coils on the rear or underneath the appliance and inspect for lint, hair, and dust. Use a soft brush or a vacuum with a narrow nozzle to remove debris. Be gentle around delicate components and avoid bending fins. After cleaning, recheck the door seals for any gaps or air leaks, and ensure the unit sits level to promote proper door alignment. Regular coil cleaning—every few months in dusty environments—helps maintain consistent temperatures and reduces noise. How To Refrigerator notes that improvement in energy efficiency often accompanies cleaner coils and better airflow, especially in bottom-freezer configurations where airflow routes can be less obvious.
If you notice persistent cooling issues after coil cleaning, a failing compressor or relay may be the underlying problem. In such cases, a professional assessment is recommended.
Ice Maker and Water Line Troubleshooting
If the ice maker stops producing ice or yields slow output, inspect the water line for kinks, leaks, or freezes along the line. A clogged water filter (if your model uses one) or a partially shut supply valve can limit water flow, affecting ice production. Ensure the water line is securely connected to the valve and verify the valve is fully open. For refrigerator-integrated ice-makers, you may also need to check the ice mold for blockages and the ejector arms for binding. When diagnosing, avoid forcing ice through a jammed mold, which can damage the ice maker mechanism. If the ice maker is separate from the dispenser, confirm the switch or control is in the correct position. The How To Refrigerator team notes that ice-maker issues are often linked to water supply problems rather than the ice-maker module itself.
After addressing water-line issues, allow a short cycling period to confirm normal ice production. If the ice maker still fails, consult the model’s service guide for Whirlpool-specific components and service steps.
Seals, Gaskets, and Door Alignment
A compromised door seal wastes energy and confuses temperature regulation. Inspect door gaskets for cracks, tears, or compression that prevents a tight seal. Clean seals with mild soap and warm water, then dry thoroughly before reassembling. If misalignment causes air leaks, adjust the doors or consult the installation guide for alignment screws. Poor door alignment can also trigger frost buildup in some models by altering airflow patterns. Regularly check the hinge area for looseness and ensure the doors swing closed automatically when near the latch. A good seal plus proper alignment helps maintain even cooling across compartments and reduces the compressor workload. The How To Refrigerator team recommends checking seals at least once a season.
If you notice persistent air leakage or visible damage to gaskets, consider replacing the seal to restore performance and energy efficiency.
When to Call a Professional: Safety and Limits
There are tasks that homeowners can handle safely, but some issues require professional service. If you encounter refrigerant smells, exposed wiring, or the unit shows fault codes beyond your comfort level, stop and call a licensed technician. Electrical troubleshooting and refrigerant work carry safety risks and legal requirements. If the unit is still under warranty, verify what the warranty covers before attempting in-home fixes. For non-urgent maintenance, track symptoms, document dates and noises, and bring this record to the technician to speed diagnosis. Remember that appliances contain pressurized systems, electricity, and potentially sharp metal edges—approach with care and never bypass safety interlocks or panels.
The How To Refrigerator Team emphasizes that a staged, safe approach preserves equipment life and protects your household.
Maintenance Schedule: Long-Term Care for a Whirlpool Bottom Freezer
Ongoing maintenance is the easiest way to extend the life of a Whirlpool bottom freezer refrigerator. Create a simple calendar for seasonal inspections: check door seals and vents, clean condenser coils, clean the interior and gaskets, and flush the defrost drain if you notice frost buildup in the freezer. Use a soft brush and a low-powered vacuum to avoid bending delicate fins. Keep the interior organized to prevent airflow blockages, and avoid overfilling shelves that can restrict air movement. Use a water filter if your model specifies one and replace it per the manufacturer’s guidance. Regular checks help you catch minor issues before they escalate and keep the appliance running efficiently. How To Refrigerator’s approach emphasizes preventive care as the most reliable path to extending the life of Whirlpool bottom-freezer models.
Tools & Materials
- Screwdriver set (Phillips and flat-head)(Include #1 and #2 sizes; used for access panels and door hardware)
- Flashlight(A narrow-beam light helps inspect coils and wiring)
- Vacuum with narrow nozzle or soft brush(Use for coils and behind panels)
- Soft cloths or microfiber towels(For cleaning seals and interior surfaces)
- Bucket or shallow pan(For defrost drainage work)
- Multimeter (optional)(Useful for checking thermostat or control-board circuits)
- Defrost-safe gloves(Handle ice/melt safely)
- Plastic pry tool (non-marring)(To separate panels without damage)
- Rags or towels for spills(Keep work area clean)
Steps
Estimated time: 2-4 hours
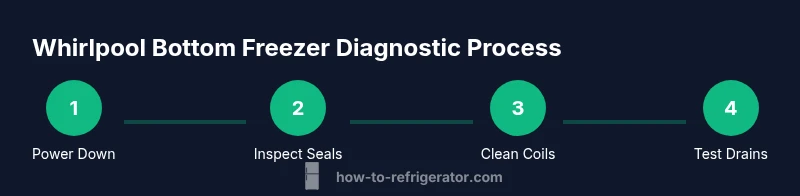
- 1
Power down and prepare the area
Unplug the refrigerator and pull it carefully away from the wall to access the back and sides. Clear the surrounding area and place towels to catch any spills. This step protects you from electrical shock and prevents accidental damage to flooring.
Tip: Have a helper nearby if the appliance is heavy; use a dolly or home-built support when moving. - 2
Inspect doors and gaskets
Visually inspect door seals for cracks, tears, or misalignment. Clean the gaskets with mild soap and warm water, then dry completely. A compromised seal can cause warm air intrusion and frost issues.
Tip: Close the door slowly and watch for even seal contact all around the perimeter. - 3
Access and clean condenser coils
Locate condenser coils (rear or underneath). Use a vacuum and soft brush to remove dust and lint without bending the fins. Clean coils improve heat rejection and reduce compressor work.
Tip: Do not use metal tools on coils; delicate fins can bend easily. - 4
Check defrost drain path
Locate the defrost drain in the freezer and verify it is clear. Flush with warm water and a gentle brush if you see frost buildup or water pooling.
Tip: Avoid chemical cleaners near food-contact areas; flush thoroughly to prevent residues. - 5
Test temperature balance mentally
Without exposing yourself to risk, observe whether the fridge and freezer feel appropriately cool after a cycle. If temperatures seem off, note whether the compressor runs continuously or cycles on/off abnormally.
Tip: Document odd cycles and noises to share with a technician if needed. - 6
Inspect ice maker and water line
If your model has an ice maker, check the water line for kinks and ensure the valve is fully open. Look for ice jams in the mold and clear gently if necessary.
Tip: Never force ice out of a jammed mold; it can damage the mechanism. - 7
Reassemble and run a test cycle
Reconnect power and push the unit back into place. Run a normal cycle and monitor for stability across both compartments for several hours.
Tip: Give the system time to stabilize; avoid making adjustments during the initial test. - 8
Evaluate cooling performance after maintenance
Assess whether the airflow, frost patterns, and ice production have improved. If issues persist, review the service manual for Whirlpool-specific diagnostic steps and consider professional inspection.
Tip: If you see codes or persistent faults, document them for the technician.
FAQ
Why is my Whirlpool bottom freezer not cooling properly?
Several factors can cause poor cooling, including air leaks from doors, dirty condenser coils, or a blocked defrost drain. Start with seals and coil cleaning, then check the defrost system if the issue persists.
Common causes are air leaks, dirty coils, or a frozen defrost drain. Start with seals and coils, then check the defrost system if needed.
What should I do about frost buildup in the freezer?
Frost buildup often indicates a defrost issue or airflow restriction. Clear the defrost drain, inspect gaskets, and ensure vents are unobstructed. If frost recurs, a component like the defrost heater may need professional testing.
Frost usually means a defrost or airflow problem. Clear the drain, check seals, and watch for recurring frost that needs a pro.
How often should I clean the condenser coils on a Whirlpool bottom freezer?
Regular coil cleaning helps maintain efficiency and cooling performance. When dust accumulates, the compressor works harder and energy use rises. Clean coils every few months, or more often in dusty areas.
Clean the coils every few months, especially in dusty spaces, to keep energy use down and cooling steady.
Is it safe to repair a Whirlpool refrigerator myself?
Basic maintenance and non-electrical checks are generally safe for homeowners. For electrical faults, refrigerant issues, or complex component tests, hire a licensed technician to avoid injury and warranty issues.
Basic maintenance is fine, but for electrical or refrigerant problems, it's best to call a professional.
My ice maker stopped working; what should I check first?
Check the water line for kinks or leaks, confirm the valve is open, and inspect the ice mold for jams. If needed, replace the filter and verify dispenser switches are in the correct position.
Check the water line and ice mold first, then verify the filter and switch positions.
What if the fridge is cold but the freezer is not?
This can indicate improper airflow or a stuck defrost cycle. Inspect vents, check for frost in the freezer, and verify the evaporator fan is running when the door is closed.
If the fridge is cold but the freezer isn’t, airflow or defrost issues are likely; check vents and the evaporator fan.
Watch Video
Top Takeaways
- Inspect seals and vents for air leaks.
- Clean condenser coils regularly for efficiency.
- Clear defrost drains to prevent frost buildup.
- Test ice maker and water line for proper operation.
- Call a pro for electrical or refrigerant concerns.