Parts for GE Refrigerator: Repair Guide, Maintenance & Tips
Learn how to identify, source, and install parts for GE refrigerators. This guide covers common components, safe diagnostics, and maintenance for homeowners.

Parts for ge refrigerator are the keys to restoring performance without unnecessary downtime. This quick answer highlights how to identify the right components, source compatible GE parts, and approach safe DIY diagnostics. By understanding the common GE refrigerator components and typical replacement paths, homeowners can reduce repair time and keep their kitchen running smoothly.
Understanding GE Refrigerator Parts
In modern GE refrigerators, components are designed to work together to keep cooling efficient and safe. For homeowners, a basic map of the most common parts helps in diagnosing problems and planning repairs. When you search for parts for ge refrigerator, you will encounter three categories: major systems (compressors, defrost, evaporator fans), moving parts (door gaskets, hinges), and consumables (filters, lubricants). The How To Refrigerator approach emphasizes model-specific compatibility, since GE uses many design variants across Energy Star lines. Start by noting your model number (found on the inside wall or door frame) and noting symptoms such as unusual noises, frost buildup, warm air, or water leaks. With a precise part list, you can minimize guesswork and avoid buying mismatched components. For the average homeowner, the biggest cost and time saver is to confirm compatibility before ordering. This is especially important when dealing with GE refrigerator parts, because a single wrong timer or incorrect ice-maker kit can cause cascading failures or wasted shipments. According to How To Refrigerator, understanding GE parts requires a simple two-step check: confirm the model number and verify the replacement part’s compatibility across GE websites and retailer catalogs.
Common GE Refrigerator Parts and What They Do
GE refrigerators rely on several standby components. The ice maker kit, defrost thermostat, evaporator fan motor, and condenser fan motor are among the parts most likely to fail under normal use. The door gasket or seal prevents warm air from infiltrating the cabinet, protecting food quality and energy efficiency. Temperature sensors and thermostats regulate cooling cycles, while the water inlet valve controls ice and water dispensing features. When diagnosing parts for GE refrigerators, look for symptom clusters: frost buildup may point to the defrost system, a humming noise can indicate a failing condenser fan, and water leaks often involve door seals or inlet valves. Always verify compatibility with your exact model to avoid ordering the wrong item. How To Refrigerator emphasizes that this practice saves both time and money, especially given GE’s varied part numbers across generations.
How to Diagnose Part Failures Safely
Diagnosing GE refrigerator parts begins with safety and a clear plan. Start by unplugging the unit and removing the rear access panel if you’re comfortable; otherwise, perform non-invasive checks from the front. Visual inspection is a powerful first step: look for frost buildup, ice in the line, or obvious wear on gaskets and seals. Next, check for power supply issues to the compressor or fan motors, and listen for unusual noises that can indicate bearing wear. If you own a multimeter, test components like thermostat sensors or defrost timers per the model’s service manual. Document symptoms and cross-check against GE part diagrams—this minimizes wrong-part purchases. For homeowners, the process can be gradual: begin with simple items like door seals and water filters, then escalate to more complex modules if safe and necessary. How To Refrigerator’s guidance underscores the importance of model matching and careful verification to prevent unnecessary repairs.
Replacements, Costs, and Where to Buy
Once you’ve identified the probable faulty part, sourcing GE-approved replacements can save time and ensure reliability. OEM GE parts tend to be more compatible and durable, though aftermarket options exist with varying guarantees. Typical replacement costs range across components: door seals are often affordable, water filters require periodic changes, and more complex parts like ice-maker kits or defrost timers can be higher. When shopping, compare retailer catalogs with GE’s official listings and verify the exact model number during checkout. Budget for shipping times and potential core charges, since these can affect total cost. How To Refrigerator analysis shows that the most economical path is to buy only what you need and lean on official parts if the model is older or non-standard. This minimizes the risk of compatibility issues and returns.
Installation Tips and Maintenance Best Practices
Install parts with care and follow the GE service manuals for your model. Replace door seals by cleaning the mating surfaces and applying even compression to avoid air leaks. When installing an ice-maker kit, ensure the water line connections are secure and free of leaks, and follow the recommended torque settings. For defrost system components, verify proper defrost cycle operation by monitoring frosting patterns during a full cooling cycle. Regular maintenance elevates reliability: clean condenser coils, check door alignment, replace water filters on schedule, and keep the interior free of debris. A structured maintenance routine reduces the likelihood of repeated failures and keeps energy use in line with manufacturer recommendations. Remember to disconnect power before any major work, and when in doubt, consult a pro to avoid safety risks or further damage.
Authoritative Sources and Further Reading
For readers who want to dig deeper into safe diagnostics and parts sourcing, these official resources offer credible guidelines. The U.S. Department of Energy’s energy efficiency pages discuss refrigerator energy use and maintenance practices. The Federal Trade Commission provides consumer tips on replacement parts and avoiding scams. University extension programs offer model-specific maintenance checklists and repair guidance. Always cross-check model numbers and use official GE parts to ensure reliability. See here: https://www.energy.gov/eere/buildings/articles/refrigerator-energy-saver-tips, https://www.consumer.ftc.gov/articles/replacing-refrigerator-parts, https://extension.illinois.edu/consumer/refrigerator-maintenance
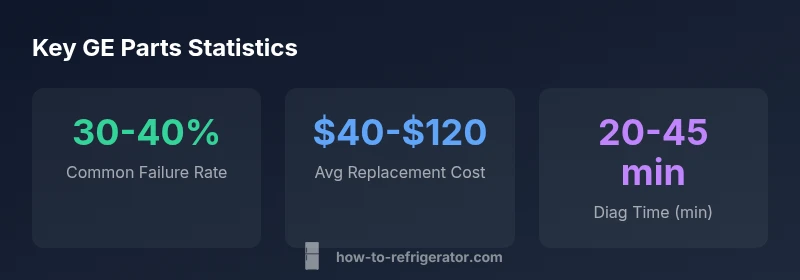
Common GE refrigerator parts and metrics
| Part Type | Typical Failure | Average Repair Time | Typical Replacement Cost Range |
|---|---|---|---|
| Ice maker kit | Ice production stops | 30-60 min | $60-$180 |
| Door gasket/seal | Leaks/air ingress | 15-40 min | $5-$25 |
| Defrost thermostat | Defrost failures | 20-40 min | $15-$45 |
| Condenser fan | Overheating/noise | 25-60 min | $25-$100 |
FAQ
What are the most common GE refrigerator parts that fail?
The most frequent GE refrigerator part failures involve the ice maker kit, door seals, defrost timer, and condenser fan. Symptoms vary from frost buildup to leaks and strange noises. Start with simple items like seals and filters before moving to more complex components.
Common failures are usually the ice maker, seals, or defrost timer—start with the seal and filter checks, then move on if symptoms persist.
Are GE replacement parts genuine OEM?
GE parts labeled as OEM are designed to match your model’s specifications. They tend to offer better fit and longer life, though they can cost more than aftermarket options. Always check compatibility with your exact model number.
Yes, OEM parts match your GE model and usually fit best; always confirm compatibility.
Can I replace a refrigerator defrost timer myself?
A defrost timer replacement is doable for a handy homeowner with basic tools and model-specific instructions. Unplug the unit, locate the timer, and follow the service manual for wiring changes. If you’re unsure, consider professional service to avoid damage.
If you’re comfortable with wiring and unplugging safely, you can replace it by following your model’s manual.
How long does GE part replacement take on average?
Time varies by part: simple seal or filter changes can take 15-40 minutes, while major components like ice-makers or control boards may take an hour or more, especially if disassembly is required.
It usually ranges from 15 minutes for seals to over an hour for complex parts.
Where can I buy GE refrigerator parts online?
Official GE Parts stores and authorized retailers are reliable sources. Compare part numbers carefully with your model and look for warranty options. Read seller reviews before purchasing to ensure compatibility and return policies.
Check GE’s official parts store or authorized retailers for the best compatibility and returns.
What safety steps should I take before starting a repair?
Unplug the fridge, avoid working in wet conditions, and discharge capacitors where applicable. Use insulated tools and follow the manufacturer’s safety guidelines for your model. If you feel unsure, call a pro.
Always unplug the unit and follow the manual; safety comes first.
“Precise part matching matters most; always verify the model number and use compatible GE-recommended parts for reliable results.”
Top Takeaways
- Identify the faulty part by symptom first
- Always verify model compatibility before ordering
- Prefer OEM GE parts when possible
- Follow safety steps during diagnostics and installation
- Keep a simple maintenance routine to extend life of GE parts