How to Put Refrigerator Drawer Back In: A Complete Guide
Learn how to put refrigerator drawer back in with a clear, step-by-step guide. Tools, safety checks, and maintenance tips to prevent future jams and keep drawers sliding smoothly.

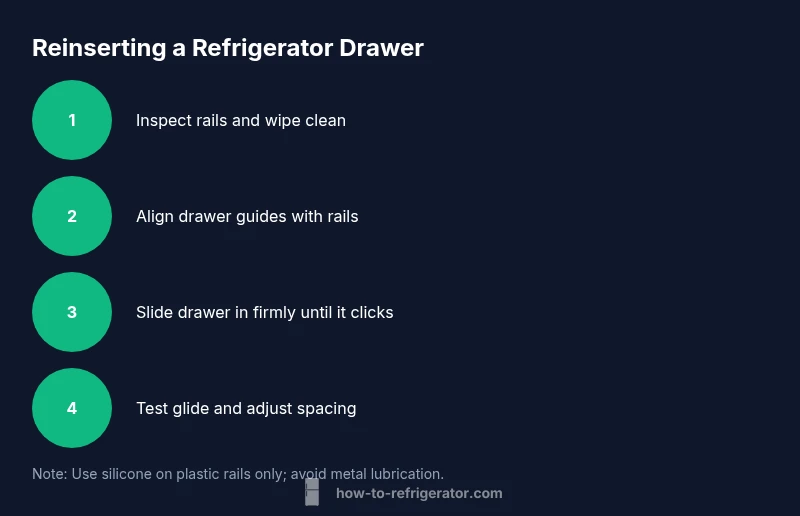
Reinserting a refrigerator drawer involves aligning the drawer with the rails, lifting slightly if needed, and sliding it straight back until it clicks. Before you start, unplug the fridge, empty the drawer, and inspect the rails for damage. With the right steps and patience, most drawers slide back in smoothly.
Why the drawer won't slide in or sits crooked
According to How To Refrigerator, most drawer misalignment starts with a slight tilt of the rail, a small obstruction, or a worn wheel. If you’ve found yourself wondering how to put refrigerator drawer back in, you’re not alone—the fix is usually simple and reversible. Start by clearing the area and inspecting the rails for debris or damage, then check that the drawer is properly aligned with the guides.
Kitchen drawers, including refrigerator drawers, ride on plastic guides or metal rails. When these guides become bent, dirty, or misaligned, the drawer can sit crooked or fail to engage the tracks. A common sign is resistance when you push the drawer in, or a squeak as you try to close. The root cause may be debris on the rails, an overstuffed drawer pressing against the sides, or a wobble in the frame. If you’re asking how to put refrigerator drawer back in, the first step is to clear the area and inspect the rails for damage.
According to How To Refrigerator, the most effective fixes start with simple checks rather than expensive replacements. Once you identify the culprit, you can often correct it by realigning or cleaning the guides. The goal is to restore alignment so the drawer slides smoothly and seats flush with the front panel.
note_content_markdown_only_for_bodyBlocks_ignored
Tools & Materials
- Flat-head screwdriver(For prying or alignment if needed, 1/8 inch or smaller tip)
- Phillips screwdriver(For rail screws, #2 Phillips preferred)
- Soft cloth or microfiber towel(Wipe rails clean and dry before reassembly)
- Food-grade silicone lubricant(Apply to plastic rails only; avoid metal slides)
- Flashlight(Inspect rails and drawers in dim areas)
- Gloves(Optional hand protection)
- Measuring tape(Optional for checks on rail alignment)
Steps
Estimated time: 15-25 minutes
- 1
Power down and prepare
Unplug the refrigerator to avoid any electrical risk while working around the control panel. Clear the area and remove any items from the drawer so you can access the rails easily. This prep reduces the chance of snagging or spills as you work.
Tip: Take a quick photo of the rail setup before you remove the drawer to help with reassembly. - 2
Remove the drawer and inspect the rails
Gently pull the drawer all the way out and set it aside. Look for dirt, spills, or warping on the rails, and check that the guides are straight and intact. Clean with a soft cloth and ensure the rails are dry before proceeding.
Tip: If rails are dirty, cleaning them now reduces friction during reinsertion. - 3
Align the drawer with the guides
Position the drawer so its sides align with the rail channels. Make sure any wheels or rollers are seated on the tracks and that the front edge sits flush with the cabinet face. Misalignment here is a common cause of binding.
Tip: Lightly tap the drawer from the sides to help start it in the rails without forcing it. - 4
Slide the drawer back in
Gently push the drawer along the guides, keeping it level and steady. Stop if you feel resistance and pause to check clearance. Continue feeding the drawer until you hear a soft click indicating it’s fully seated.
Tip: Don’t rush this step—apply steady, even pressure to avoid bending any guides. - 5
Test the drawer operation
Open and close the drawer a few times to confirm smooth motion and proper seating. If it binds, back it out slightly and re-align before trying again. Ensure it stops at the same height each time for a consistent fit.
Tip: A gentle test run ensures you didn’t miss a misalignment earlier. - 6
Clean up and document
Wipe away any fingerprints or stray lubricant. Reinsert any items you removed and take note of any recurring issues. If you found damage, consider part replacement rather than repeated repairs.
Tip: Keep a small checklist for future maintenance.
FAQ
What should I do if the drawer won’t slide after reinsertion?
Double-check the alignment of the rails and drawers. Ensure there’s no debris causing obstruction. If it still won’t slide, remove the drawer and recheck the tracks for any bends or misalignment.
If it still won’t slide, remove and recheck the tracks for any bends or debris.
Is unplugging necessary before reinserting the drawer?
Yes. Unplugging minimizes electrical risk and prevents the interior light or control components from engaging while you work.
Yes—unplug first to stay safe.
Can I use WD-40 or other oils on refrigerator rails?
Avoid petroleum-based lubricants. Use a food-grade silicone lubricant on plastic rails only; metal rails generally don’t need lubrication.
Avoid WD-40; use silicone lubricant on plastic rails.
How long does it typically take to fix a drawer issue?
Most drawer reinsertion tasks take about fifteen to thirty minutes, depending on rail condition and drawer design.
Most fixes take about fifteen to thirty minutes.
What if the drawer keeps coming off the rail?
Check if the drawer slides are compatible with the model and inspect for bent rails or missing guides. Replacement parts may be necessary.
It may need rail or drawer replacement.
Should I contact a professional if it’s under warranty?
Yes. If your refrigerator is under warranty, contact the manufacturer or a certified technician before attempting home repairs.
If under warranty, contact support rather than DIY fixes.
Watch Video
Top Takeaways
- Align rails before reinserting
- Clean rails to prevent friction
- Avoid forcing the drawer
- Test operation before closing the door