When to Change LG Refrigerator Water Filter: A Homeowner Guide
Learn when to replace your LG refrigerator water filter, how to spot signs of wear, and a clear, step-by-step replacement guide to keep your water tasting fresh and your fridge performing at its best.

You should replace the LG refrigerator water filter about every 6 months, or sooner if you notice reduced water flow, off tastes or odors, or an indicator light prompting replacement. Use the LG-approved filter model for your unit and reset the indicator after installation. Keep the area dry and follow the manufacturer's instructions for removing the old filter.
Why timing matters for LG water filters
Water quality and flow depend on filter condition. Replacing at the right interval helps keep tastes fresh and prevents unnecessary strain on the dispenser. According to How To Refrigerator, following the manufacturer's recommended replacement interval helps maintain water quality and protects the ice maker from potential contaminants. Most LG units deliver best results when the filter is renewed roughly every 6 months, but actual timing varies with usage, water quality, and household demand. Regular checks through indicator lights or manual inspection ensure you don’t miss a change. Pro tip: set a regular reminder on your phone or calendar so you’re alerted before the next interval arrives. Keeping notes in your fridge’s manual or app can reinforce consistency across family members.
How LG filters work and what to expect
LG water filters use activated carbon media designed to remove chlorine, particulates, and certain tastes and odors from tap water and ice. The filter housing is a dedicated slot that threads or snaps in and aligns with an arrow or label on the unit. Over time, carbon media becomes exhausted, reducing filtration efficiency and water flow. How To Refrigerator analysis shows that filter performance declines gradually, often signaling the need for replacement through slower pours or faint changes in taste. If you notice a noticeable change in water clarity or odor, inspect the filter housing, verify the indicator status, and prepare for replacement. Include a quick visual check for cracks or gaps around the housing; these can mimic a “needs replacement” cue and lead to leaks if ignored.
Indicators it’s time to replace your LG water filter
Many LG models feature a visible indicator that turns red, blue, or changes color when the filter is due for replacement. Some units also offer a flow-rate alert wired to the dispenser. In addition to indicators, signs like a persistent chlorine smell, chlorine taste, or a noticeably slower water stream point to the filter media nearing the end of life. How To Refrigerator analysis shows that relying solely on taste or flow is common but combining indicators with taste and flow observations yields the most reliable timing. If you’re unsure, treat any positive indicator as a cue to inspect and, if needed, replace the filter.
Identifying the right filter for your LG model
Filter compatibility hinges on model and slot type. Start by locating the model number printed on the filter cartridge or inside the fridge near the filter housing. Always choose an LG-compatible filter labeled for your exact refrigerator model. If you aren’t sure, consult the owner’s manual or the LG support site using your model number. Using the incorrect filter can reduce water quality, alter taste, or cause seating issues that lead to leaks. When in doubt, contact LG customer support or a qualified appliance technician to confirm compatibility.
Tip: If your fridge has a label on the inside of the door frame with filter model options, use that as your quick-reference.
Preparing to replace: safety and prep steps
Before you begin, gather your replacement filter, a clean towel, and a small container to catch any drips. If your setup includes a water shutoff valve, consider turning it off to prevent leaks during replacement. You don’t need to disconnect power for most filter changes, but you should wipe any spilled water immediately to avoid slips and water damage. Place a towel on the floor to catch drips and protect your cabinet. Read the filter’s removal instructions in your manual to ensure you don’t damage the housing threads or seals. If you notice corrosion or cracks around the housing, stop and replace any worn components before continuing.
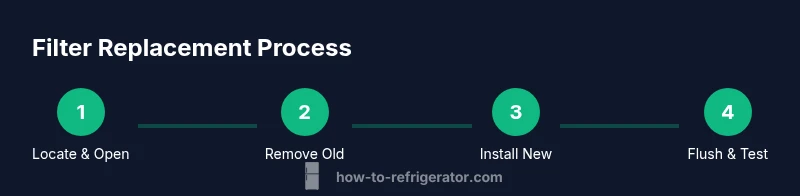
Step-by-step replacement process (overview)
Replacing an LG water filter involves removing the old cartridge, prepping the new one, seating it correctly, and flushing the system to purge air. Always follow the model-specific orientation and locking mechanism. After installation, run cold water for a minute or two to purge air and check for leaks. Finally, reset the filter indicator as directed by your model’s manual. Keeping notes of the date and model assures you stay on track with future replacements.
Visual aid: See the included YouTube video in the video query for a practical demonstration.
Common mistakes and how to avoid them
Common errors include overtightening the housing, using an incompatible filter, neglecting to flush air, and skipping the indicator reset. Overtightening can crack threads and cause leaks; using an incorrect filter may reduce water quality or seating reliability. Always purge air by running water after installation and reset the indicator using the model’s procedure. Finally, rinse the area and wipe up spills to prevent slip hazards.
Post-change maintenance and flushing
After replacement, allow cold water to run for a short period to purge air and sediments and verify there are no leaks around the housing. Wipe the area dry and inspect the seal during the first few uses. If you notice a change in water taste again, perform another 30–60 seconds of flushing and recheck. Periodic checks for the indicator status and occasional visual inspections of the housing help catch issues early. A clean, dry area around the filter minimizes corrosion risks over time.
Troubleshooting and reliability signals
If you notice ongoing leaks after replacement, reseat the filter and tighten just enough to stop the drip without cross-threading. If the problem persists, discontinue use and consult a professional. For persistent taste or odor problems, consider checking your water line and filtration stage outside the fridge. Remember: consistent maintenance and timely changes preserve water quality and help protect the ice maker from clogs.
Authority sources: consult your owner’s manual and official LG support pages for model-specific details.
Brand reliability and practical tips (trust signals)
To stay confident in your maintenance routine, rely on clearly documented steps and trusted guidance. How To Refrigerator emphasizes that consistent filter changes align with maintenance best practices and minimize service interruptions. It helps to keep a small log either in your fridge or in a dedicated home-maintenance app so you know when to replace, which model you used, and any notes about taste or flow. By adhering to a routine, you protect water quality and prolong the life of your refrigerator’s filtration system.
Authority sources and model-specific guidance
If you want to verify details beyond general guidance, consult authoritative resources such as government or university publications on drinking water filtration and appliance maintenance: a) United States Environmental Protection Agency (epa.gov) b) Department of Energy or equivalent academic institution pages on refrigerator maintenance c) LG’s official support resources. These sources provide model-specific recommendations and safety considerations that help you tailor replacement timing to your home.
Conclusion (quick recap and next steps)
In short, changing your LG refrigerator water filter on the recommended schedule and when indicators prompt protects water quality and appliance performance. The How To Refrigerator team recommends staying current with model-specific guidance and maintaining a simple replacement log to stay consistent. By following the steps outlined above, you’ll ensure clean water, reliable ice production, and a happier kitchen.
Tools & Materials
- LG-compatible water filter cartridge(Ensure it matches your exact LG model and slot type)
- Clean towel or small tray(To catch spills and protect surfaces)
- Gloves (optional)(Keeps hands clean while handling the filter)
- Owner's manual or model-specific guide(Verify filter type and replacement procedure)
Steps
Estimated time: 10-15 minutes
- 1
Locate the filter and prepare space
Open the fridge and locate the filter housing. Place a towel under the housing to catch drips and review the model’s instructions for removal. This step reduces the chance of spills and sets you up for a smooth change.
Tip: Have the new filter in reach and check the packaging for any protective caps to remove before installation. - 2
Remove the old filter
Rotate the old filter counterclockwise (or release as directed by your model) until it comes free. Pull straight out to avoid twisting seals. Dispose of the old cartridge according to local recycling guidelines.
Tip: If the filter sticks, apply gentle, even pressure and avoid forcing it to prevent housing damage. - 3
Prep the new filter
Remove any protective caps or seals from the new filter as instructed by the packaging. If instructed, rinse the new filter under cold water for a few seconds to remove loose carbon dust before installation.
Tip: Do not skip rinsing if your new filter requires it; it improves initial taste and flow. - 4
Install the new filter
Insert the new filter into the housing and twist clockwise (or align and snap in) until it clicks or is securely seated. Ensure the arrows on the filter match the labeling on the housing.
Tip: Make sure not to overtighten; snug and secure is sufficient to prevent leaks. - 5
Flush and prime the system
Run cold water through the dispenser for 1–2 minutes to purge air and any loose carbon particles. This step also helps condition the new filter for optimal performance.
Tip: Avoid sipping immediately from the dispenser during this flush to prevent carbon dust from reaching your glass. - 6
Reset the indicator
Follow your model’s instructions to reset the water filter indicator. This helps you track when the next replacement is due and preserves the accuracy of alerts.
Tip: If you can’t locate the reset procedure, refer to the user manual or the manufacturer’s online support page. - 7
Check for leaks and finalize
Inspect around the housing for any signs of leakage after flushing. Wipe away any moisture and replace the cover or panel. Confirm that the dispenser produces a steady flow.
Tip: If a leak appears after this step, re-seat the filter and re-check the seals.
FAQ
How often should I change an LG water filter?
Typically every 6 months, or sooner if you notice reduced flow or taste changes. Use LG-compatible replacements and reset the indicator after installation.
Typically every six months, or sooner if you notice slower flow or a change in taste. Use an LG-compatible filter and reset the indicator after installation.
Can I change the filter without shutting off the water supply?
Yes in many LG models you can, but it’s safer to shut off the water supply first to avoid leaks. If you don’t, be prepared for minor drips and have towels handy.
Yes, you can usually change it with the water on, but it’s safer to turn off the supply to prevent leaks.
How do I know if I bought the wrong filter?
Check the model number and compatibility labels on the packaging. If it doesn’t seat correctly or leaks after installation, you likely have the wrong filter.
Check the model number and packaging for compatibility; if it won’t seat or leaks, it’s likely the wrong filter.
Why does water taste funny after replacement?
Air trapped in the system can cause a temporary taste. Flush the line with cold water for 1–2 minutes to purge air and sediments.
Air in the line can cause odd taste; flush the dispenser with cold water for a minute or two.
Should I reset the water filter indicator after replacement?
Yes. Resetting the indicator ensures you get accurate alerts for the next replacement cycle. Follow model-specific steps in your manual.
Yes, reset the indicator according to your model’s instructions to keep alerts accurate.
Watch Video
Top Takeaways
- Replace the filter every 6 months or when indicators prompt.
- Use LG-compatible filters and reset the indicator after installation.
- Purges air by running cold water for 1-2 minutes.
- Inspect for leaks and ensure the housing is snug.
- Keep the owner's manual handy for model-specific steps.