How to Measure Refrigerator Depth Accurately for Fit
Learn how to measure refrigerator depth accurately, with definitions, tools, and a practical step-by-step guide to ensure your fridge fits your kitchen and maintains proper ventilation.

Depth is defined as the distance from the front exterior surface of the fridge to the back of the cabinet with the doors closed. For space planning, also check the depth when doors are opened to 90 degrees and whether the specification includes protruding handles. Always verify measurements on the product sheet or model nameplate.
What depth means for refrigerators
Depth is a fundamental specification that determines how a refrigerator fits in your kitchen. It governs not only how much space the unit will occupy against a wall, but also how easily you can open the doors, access the shelves, and ventilate the back of the appliance. According to How To Refrigerator, depth is more than a number on a spec sheet; it directly impacts installation, clearance, and overall kitchen flow. Homeowners who understand depth can plan around cabinet thresholds, ensure the fridge clears nearby appliances, and avoid hard-to-reach configurations that make daily use frustrating.
Exterior depth vs interior depth vs door depth: what’s the difference
When people talk about depth, they’re usually referring to exterior depth—the distance from the front of the fridge to the back. Some models publish interior depth (space inside the cabinet) for drawer or shelf planning, but this is less useful for floor space. Door depth, including any handle protrusion, can add to the exterior depth and affect how far you need to pull the fridge away from the wall. The How To Refrigerator team notes that manufacturers may measure differently, so always compare apples to apples by using the same reference point across models.
Key depth terms you’ll encounter on product sheets
- Exterior depth with doors closed: the standard measurement used for most floor-space planning.
- Exterior depth with doors opened 90 degrees: useful when you want to ensure you can access the interior without hitting a wall or cabinet.
- Cabinet depth vs. overall depth: cabinet depth excludes door thickness, while overall depth includes doors and handles in some models.
- Counter-depth vs standard-depth: counter-depth fridges sit closer to the counter but may reduce internal space. Understanding these terms helps you select a model that fits both size and function needs.
Tools and approach to measure depth accurately
Before you measure, gather a tape measure, a notepad, a pen, and a helper if possible. A simple, methodical approach yields reliable results: measure from the wall to the outermost edge of the door when closed, then re-measure with the door opened to 90 degrees, and finally check if the spec includes any protruding handles. This multi-point check helps you avoid surprises at installation and ensures you can compare models confidently. How To Refrigerator emphasizes verifying measurements on the product sheet or nameplate for accuracy.
Practical measurement workflow you can follow
A practical workflow starts with locating the official depth specification on the model’s nameplate or product sheet. Then, clear the area and lay out your measuring tools. Take exterior depth measurements with doors closed, then with doors opened, and note any handle-related variations. Record all data in a dedicated space so you can translate it into floor planning, ensuring you have the space needed for ventilation and door swing.
Ventilation, clearance, and installation implications
Ventilation space around the refrigerator is essential to maintain efficiency and prevent overheating. Leaving at least small gaps on the sides and above the unit helps air circulate, which can affect performance and longevity. If you’re installing a fridge next to a cabinet or under a countertop, thickness and depth beyond the installed unit can influence door clearance and hinge operation. The How To Refrigerator guidance stresses planning for these clearances before purchase.
Shopping smarter: using depth to compare models
When you shop, depth data helps you filter models that will physically fit your space. Create a simple depth benchmark from your measurements and compare it against each model’s exterior depth (closed doors) and opened-door measurements. By aligning your kitchen layout with measured depth, you can avoid costly returns and ensure the unit aligns with cabinets, toe-kicks, and wall space. How To Refrigerator’s approach is to use depth as a primary fit criterion alongside width, height, and energy considerations.
Tools & Materials
- Tape measure(2–3 meters (6–8 ft) tape measure; ensure it extends to at least the widest depth you expect)
- Notepad and pen(To record multiple measurements and reference points)
- Step ladder or solid stool (if needed)(For reaching high cabinets or top-of-unit measurements)
- Owner’s product sheet or model label(Optional but helpful to compare measured depth with official specs)
- Helper (optional)(Having someone hold the tape helps accuracy when doors swing)
Steps
Estimated time: 15-25 minutes
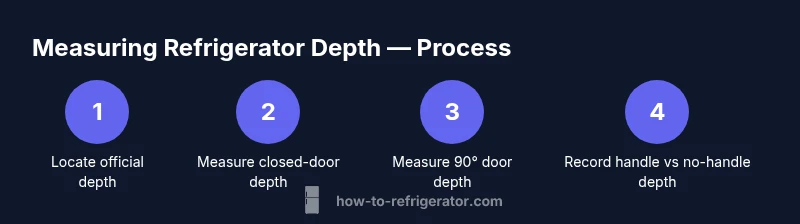
- 1
Locate the official depth spec
Find the depth specification on the model nameplate or product sheet. This provides the official depth the manufacturer expects for installation. If you can’t locate it, check the retailer listing for the exact depth with doors closed.
Tip: If numbers don’t align across sources, use the product sheet as your primary reference. - 2
Prepare your measuring area
Clear the space in front of the fridge, and remove any obstacles. Have your tape measure ready, and mark a reference point on the floor for repeatable measurements. This minimizes errors when you measure multiple depths.
Tip: Mark the wall with a piece of painter’s tape at the base of the refrigerator for quick reference. - 3
Measure exterior depth with doors closed
Place the tape at the wall and extend straight to the front surface of the refrigerator, including door thickness. Record this depth to compare against the model’s closed-door spec.
Tip: Measure at the middle of the unit to account for any bowing or irregularities. - 4
Measure exterior depth with doors opened 90 degrees
Carefully measure the distance from the wall to the furthest point of the door edge when the doors are open at a right angle. This helps you plan space for door swing and clearance.
Tip: Have a helper hold the door steady to ensure accuracy. - 5
Note handle protrusion and door swing
If the manufacturer lists depth excluding handles, measure both with handles and without to avoid space miscalculations. Some handles add significant depth.
Tip: Always record both figures in your notes for cross-model comparisons. - 6
Assess ventilation clearance
Determine if you need extra space on the sides and top for airflow. This reduces heat buildup and can improve efficiency.
Tip: Avoid compressing the unit into tight alcoves; even a few inches can matter. - 7
Compare measurements to your space
Place your recorded depths alongside floor plan measurements or a space diagram. Confirm the deepest depth (with doors opened) fits with at least minimal clearance.
Tip: If in doubt, leave a margin of error of a few inches for movement and airflow.
FAQ
Handles included in depth measurements?
Depth specs can include or exclude handle protrusion. Always check whether the measurement accounts for handles and record both figures when possible.
Check if the depth includes handles and record both numbers for accuracy.
What’s the difference between standard-depth and counter-depth fridges?
Standard-depth fridges sit deeper and usually offer larger interior space, while counter-depth models sit closer to the counter, saving space but often with less interior room.
Standard-depth is deeper and roomier inside; counter-depth sits nearer the counter but may have less space.
How important is ventilation space?
Ventilation space helps with airflow and efficiency. Plan for at least a small clearance around the sides and top, especially in tight kitchens.
Ventilation space improves efficiency; keep some clearance around the fridge.
What units should I use for measurements?
Use inches for US measurements; millimeters are fine if you’re converting from another system, but keep notes in inches for consistency.
Use inches, or convert carefully if you prefer metric.
Where can I find the official depth spec?
Look on the product sheet or the model nameplate inside the fridge or in the retailer’s listing. The nameplate is the most reliable source.
Check the model nameplate or product sheet for the official depth.
Watch Video
Top Takeaways
- Measure both closed and opened door depths.
- Verify official specifications on the product sheet.
- Plan for ventilation clearance around the fridge.
- Use depth data to compare models during shopping.