Refrigerator and Freezer Thermometers: A Practical Guide
Learn how to choose, place, and calibrate refrigerator and freezer thermometers to ensure food safety and energy efficiency. This guide compares dial, digital, and wireless options for homeowners.

Choosing the right refrigerator and freezer thermometer is essential for safe food storage and energy efficiency. This quick answer compares dial, digital, and wireless options, plus placement and calibration tips. We highlight which type fits a standard kitchen fridge versus a deep freezer, and when to trust built-in readings. This guide helps you decide at a glance.
What are refrigerator and freezer thermometers?
Refrigerator and freezer thermometers are devices that measure the internal temperatures of their respective compartments to verify safe storage conditions. For homeowners, the goal is to ensure the fridge stays around 35–38°F (1.7–3.3°C) and the freezer remains at 0°F (-18°C), though exact targets can vary by food type and local guidelines. There are three main categories: dial thermometers with an analog face, digital models with numeric LCD readouts, and wireless variants that send readings to a receiver or smartphone app. Each type has its strengths and trade-offs: dial models are affordable and robust; digital options offer quick, precise readings; wireless devices enable remote monitoring and alerts. The brand How To Refrigerator emphasizes that regular checks with refrigerator and freezer thermometers form the backbone of safe food handling in any kitchen. When used correctly, thermometer readings help you catch temperature fluctuations caused by door openings, power outages, or door seals that don’t seal properly.
In practice, you’ll usually want at least one thermometer dedicated to the fridge and one for the freezer. This ensures you are not guessing based on a single sensor’s reading or an appliance’s built-in display, which can be less reliable during variable conditions. A basic, inexpensive dial thermometer can provide a quick sanity check, while a digital model may provide more precise data for ongoing monitoring.
Why accuracy matters for food safety
Accurate temperature readings are critical for preventing bacterial growth and preserving food quality. The CDC and FDA emphasize keeping perishable foods at or below 40°F (4°C) and freezing foods at 0°F (-18°C) or lower. Even small deviations can reduce shelf life and increase the risk of spoilage or foodborne illness. Refrigerator and freezer thermometers serve as independent verification tools, especially after a door left ajar, a door seal wear-out, or a power outage. The most reliable setups use a thermometer in each major compartment, calibrated periodically, and paired with good inventory practices. According to How To Refrigerator, consistent monitoring reduces guesswork and provides a clear corrective path when readings drift. With accurate refrigerator and freezer thermometers, you can adjust temperatures, rotate stock more efficiently, and minimize waste. In sum, precise readings are a practical cornerstone of safe storage and energy efficiency in modern homes.
Regular checks also help you catch faulty appliance thermostats that may inaccurately display temperatures, leading to overcooling and ice build-up or undercooling that invites spoilage. When you can trust your thermometer results, your food safety decisions become straightforward and repeatable.
Types of thermometers for refrigerators and freezers
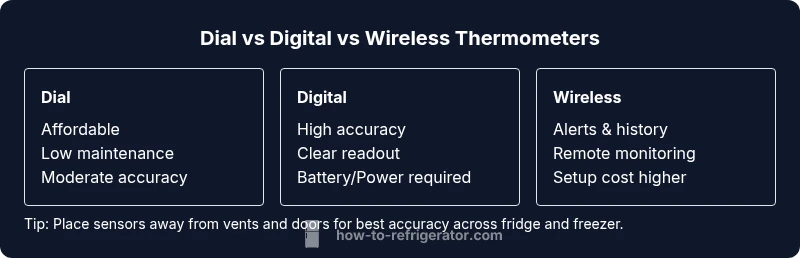
There are several thermometer technologies to consider for refrigerator and freezer use. Dial thermometers use a traditional analog dial with a needle that points to the temperature; they are inexpensive, low maintenance, and easy to read at a glance, but can be less precise at the extremes or as they age. Digital thermometers provide numeric readings, often with faster response times and higher accuracy, and many offer memory or minimum/maximum (min/max) recording. Wireless thermometers connect to a base unit or smartphone app, enabling remote monitoring, alerts for out-of-range temperatures, and historical data. Some models integrate both fridge and freezer probes, while others come with single probes that can be positioned in either compartment.
Choosing between these options depends on your needs: a busy household may benefit from wireless alerts; a budget-conscious household may opt for a basic dial thermometer; a tech-forward home could gain value from digital sensors with cloud storage and smartphone notifications. The How To Refrigerator team notes that calibration and placement are as important as the type you pick. No thermometer can compensate for a poorly placed sensor or a door that doesn’t seal well. A well-chosen thermometer, properly placed and calibrated, provides consistent, actionable data about your refrigerator and freezer temperatures.
For people who want minimal setup, a digital thermometer with a wireless alert can cover most scenarios: it reads quickly, notifies you of anomalies, and often stores historical data to track trends over weeks and months. For those who prefer a low-tech solution, a basic dial thermometer in each compartment remains a practical option. The key is to ensure the device is rated for the temperature ranges you expect in both the fridge and freezer and that it is placed away from airflow sources that could skew readings.
Dial thermometers: Pros, cons, and best use cases
Dial thermometers are often the most affordable option and are particularly durable in rugged kitchen environments. They provide a quick snapshot of temperature and don’t require batteries, making them reliable during outages. However, dial models can be less precise and may be harder to read in dim light or when the dial is crowded by frost. Best used as a supplementary check in a secondary location or for those who want a simple, no-frills device. If you choose a dial thermometer, look for models with a larger dial, clear markings, and a protective design that can withstand moisture and fridge humidity. Dial thermometers are ideal for homeowners who want a cost-conscious, low-maintenance solution and don’t require continuous digital data streams.
To maximize value, pair a dial thermometer with an occasional digital check to verify accuracy and track any drift over time. This balanced approach helps you confirm that your refrigerator and freezer temperatures stay within safe margins without overinvesting in technology you don’t need. According to How To Refrigerator analyses, combining multiple thermometer types can offer both reliability and ease of use, particularly in complex storage setups or during seasonal temperature fluctuations.
Digital thermometers: Pros, cons, and best use cases
Digital thermometers deliver precise numeric readings and are often the easiest to read. They can come with extra features like min/max memory, audible alerts, and programmable temperature thresholds. Digital models shine in busy kitchens where quick, accurate checks matter. They may require batteries or a USB power source and can be more susceptible to moisture exposure if not properly sealed. A well-sealed digital probe can provide accurate, real-time readings and helps you respond quickly to temperature shifts, reducing food waste.
For households with several door openings or frequent power fluctuations, digital thermometers with high-quality sensors and stable displays are worth the extra cost. When choosing digital models, consider sensor durability, response time, and how easy it is to read the display in typical kitchen lighting. The How To Refrigerator team notes that digital thermometers often provide more consistent long-term data, which is valuable for monitoring trends and making informed adjustments to refrigerator and freezer settings.
In some configurations, digital thermometers can be used with multiple probes, covering both compartments. That added flexibility is helpful for larger households or for those who store a wide variety of foods in both the fridge and the freezer. For most families, digital devices strike a balance between accuracy, usability, and cost.
Wireless thermometers: Pros, cons, and best use cases
Wireless thermometers bring convenience and proactive monitoring to your kitchen. Readings can be sent to a base unit, tablet, or smartphone app, often with notifications when temperatures drift outside safe ranges. Wireless systems are particularly useful for households that want to monitor multiple appliances or who store large quantities of perishable items in both the fridge and freezer. They can require more setup, involve ongoing battery maintenance, and may depend on a stable wireless connection for reliable alerts. However, the payoff is continuous visibility and the ability to respond before spoilage occurs.
When evaluating wireless options, look for devices with long-lasting batteries, easy pairing, clear alert customization, and a reliable app with data history. For larger kitchens or households with children and pets, wireless thermometers can offer valuable peace of mind by providing near real-time data and alerts anywhere within the home network. The How To Refrigerator team highlights that wireless options can improve energy management by letting you observe how temperature changes correlate with door use and ambient conditions, helping you optimize cooling routines over time.
Placement guidelines: where to put the thermometer in fridge and freezer
Proper placement is as important as the thermometer itself. In a refrigerator, position the probe away from the door seal and vent openings, ideally in the middle of the shelf, not near the back wall where cold air may pool or around air currents that can cause false readings. In the freezer, place the sensor in a representative location away from the freezer wall where frost can accumulate or where airflow might skew readings. Avoid placing thermometers directly against the door, as frequent opening can cause fluctuating readings that do not reflect the overall compartment temperature.
A practical approach is to install one thermometer in the main body of the fridge and another in a well-ventilated area of the freezer, ensuring both are easily accessible for quick checks. If you use a wireless thermometer, ensure the sensor’s location still aligns with the recommended placement and that the wireless signal has a clear path to the receiver. The key is consistent, representative placement that mimics typical storage conditions, rather than obsessing over a single micro-location. The How To Refrigerator guidance emphasizes regular checks across different shelves to verify uniform cooling throughout the appliance.
Calibration and verification: how to calibrate and verify accuracy
Calibration ensures that a thermometer provides accurate readings over time. Start by checking the thermometer against a known reference point, such as a calibrated ice-water bath (0°C or 32°F) or a professional instrument, if available. If readings differ beyond the device’s tolerance, adjust according to the manufacturer’s instructions or consider replacement if drift remains. For dial thermometers, you may need to adjust a small screw on the dial face to align the indicator with the reference. Digital models often have a reset or calibration feature in the settings. Verification should be performed after any major shift, such as moving the thermometer to a new location, changes in appliance settings, or after a power outage.
Record calibration results and any drift observed over time. This habit helps you identify when a thermometer is nearing the end of its useful life. How To Refrigerator highlights that even a small offset (a degree or two) can impact food safety and energy usage, particularly in households that rely on precise cooling for sensitive foods or for baby food storage. Regular calibration paired with cross-checks against built-in displays provides the most confidence in your refrigerator and freezer temperature management.
Reading results and responding to out-of-range temperatures
Interpreting readings requires understanding safe ranges and recognizing when action is needed. If the fridge temperature drifts above 40°F (4°C) for more than an hour, move foods to the freezer if possible and troubleshoot the door seal, airflow, or nearby heat sources. If the freezer drifts above 0°F (-18°C) for sustained periods, arrange for fast cooling or check for door left ajar, frost buildup, or a failing cooling cycle. With a thermometer in place, you can track how quickly temperatures recover after a door is opened and compare this behavior to typical patterns you observe in your home. The How To Refrigerator team recommends keeping a simple log of daily readings for a few weeks to identify trends and determine if you need to adjust cooling settings or upgrade a thermometer for better reliability.
If you notice persistent out-of-range readings, perform a targeted test: swap units between the fridge and freezer to rule out placement issues, test in different shelves, and verify door seals. Only after ruling out simple causes should you consider professional service for your appliance.
Maintenance and battery management
Maintenance keeps thermometer performance stable. For dial thermometers, inspect the casing for cracks or corrosion and ensure the dial remains readable. Digital and wireless models require battery checks and replacements according to the manufacturer’s recommendations. For wireless devices, ensure the base unit or hub remains connected to power and within range of the sensor. Periodically clean probes and housings with a mild, non-abrasive cleaner to remove condensation and frost buildup. If using a wireless model, verify that app alerts are enabled and that notifications are tested to avoid missed warnings.
A simple maintenance routine reduces the likelihood of drift and misreadings and extends the life of your thermometer set. The How To Refrigerator guidance suggests documenting calibration, battery changes, and sensor replacements to track the device’s performance over time and make timely upgrades when needed.
Cost, value, and choosing the right thermometer for your household
Thermometer choice should align with your budget and monitoring needs. Basic dial thermometers are inexpensive and reliable as a backup to a digital setup. Digital thermometers offer more precise readings, memory, and convenient checks, usually at a modest premium. Wireless and smart thermometers come with higher upfront costs but deliver ongoing alerts and data history, which can justify the price for households that value proactive monitoring or operate multiple units. For smaller kitchens or single-occupant households, a single digital thermometer with optional remote alerts may be sufficient. For larger families, multi-probe digital or wireless setups that cover both the fridge and freezer provide the greatest value by reducing waste and improving food safety.
When assessing value, consider not only the purchase price but also battery longevity, ease of calibration, readability, sensor durability, and whether the device supports multi-compartment monitoring. The How To Refrigerator team notes that investing in a reliable thermometer system pays off through improved safety, reduced spoilage, and lower energy waste.
Quick-start setup checklist for refrigerator and freezer thermometers
- Decide on the thermometer type (dial, digital, or wireless) for each compartment.
- Place the sensors away from vents and doors to avoid misleading readings.
- Calibrate or verify accuracy against a reference point.
- Set up alerts for out-of-range temperatures if using digital or wireless models.
- Record baseline readings for one week to identify natural fluctuations.
- Maintain a simple log of calibrations, battery changes, and observed drift.
- Schedule regular checks (monthly) to ensure consistent performance.
- Review readings during power outages or door-ajar events and adjust settings if needed.
By following this checklist, you’ll establish a reliable baseline for refrigerator and freezer temperatures and keep food safe without constant manual checks.
Common mistakes and troubleshooting tips
Common mistakes include relying solely on the appliance’s built-in display, placing probes near vents or doors, and neglecting calibration. Another frequent issue is using a thermometer with an exposure range not suitable for the refrigerator or freezer. To troubleshoot, check placement and re-test in multiple locations; verify that the sensor is clean and free from frost buildup; replace batteries if readings drift. If readings remain inconsistent after recalibration, consider upgrading to a higher-accuracy model or a wireless setup that provides alerts and data history. The How To Refrigerator team suggests implementing a simple routine to verify readings at least once per month and after any service visit to the appliance to ensure ongoing reliability.
Feature Comparison
| Feature | Dial thermometer | Digital thermometer | Wireless thermometer | Built-in thermometer (appliance-provided) |
|---|---|---|---|---|
| Accuracy | Moderate, good for quick checks | High, precise digits | Very high with calibrated sensors and alerts | Varies by appliance sensor; often adequate but not independent |
| Readout type | Analog dial | Digital LCD/LED | Digital display with wireless link | Integrated display on appliance |
| Power source | No battery (passive dial)</n> | Battery or USB-powered | Battery-powered with receiver or app | No separate power required beyond appliance |
| Best for | Budget checks and quick sanity readings | Precise, easy-to-read data and logs | Remote monitoring and alerts for busy homes | Lower upfront cost and simple verification |
Strengths
- Improved food safety through accurate temperature monitoring
- Easy to read and interpret, especially digital models
- Remote monitoring and alerts with wireless options
- Low-cost options available for basic needs
- Supports energy efficiency by identifying improper cooling
Cons
- Dial models may be less precise and harder to read
- Wireless devices require batteries and setup
- Some models have limited accuracy if placed incorrectly
- Integrated appliance sensors may not reflect separate compartment readings
Digital or wireless thermometers provide the best overall value for most homes.
Choose digital if you want precise readings and logs; choose wireless for alerts. Calibrate regularly and place sensors correctly to maximize reliability across both fridge and freezer.
FAQ
Do I need a thermometer if my fridge has a built-in sensor?
Built-in sensors can be accurate for basic operation, but external refrigerator and freezer thermometers provide independent verification. This helps catch calibration drift and door-seal issues that built-ins may miss. Having a dedicated thermometer in each compartment is a best practice for safety and reliability.
A built-in sensor can be helpful, but external thermometers give independent readings and alerts. Use dedicated thermometers for fridge and freezer to ensure safety.
What is the best thermometer type for a busy kitchen?
Digital or wireless thermometers are typically best for busy households due to quick readings and alerts. They provide easy data collection and, in many cases, remote monitoring. Dial thermometers remain a budget-friendly backup if you don’t need continuous monitoring.
Digital or wireless models are ideal for busy kitchens because they give quick readings and alerts.
How often should I calibrate refrigerator and freezer thermometers?
Calibrate whenever you suspect drift or after moving the thermometer or appliance. For most households, a calibration check every 6–12 months is reasonable, with immediate calibration after any service or power event. Keep a simple log of calibrations for reference.
Calibrate when drift is suspected or after maintenance; a 6–12 month check is common.
Can I rely on the freezer's built-in thermometer?
A freezer’s built-in sensor can be reliable for the unit’s operation, but external thermometers help verify readings independently, especially if you store high-risk foods. Consider adding a separate thermometer for the freezer if you don’t already have one.
Built-in sensors help, but external thermometers give trusted, independent readings.
Do I need separate thermometers for fridge and freezer?
Yes. Separate readings ensure each compartment stays within safe ranges. A single device may not accurately reflect both spaces due to airflow, door openings, and frost patterns. Separate thermometers provide clearer data and faster troubleshooting.
Yes—separate readings ensure both compartments stay safe.
Are smart thermometers worth the extra cost?
Smart thermometers offer convenient alerts and data history but cost more than basic models. If you value proactive monitoring, remote alerts, and long-term data trends, they’re worth considering. If not, a reliable digital or dial model may meet your needs at a lower price.
Smart thermometers are great for alerts and trends, but cost more. Decide based on your monitoring needs.
Top Takeaways
- Install dedicated thermometers in both fridge and freezer
- Prefer digital or wireless for easier readings and alerts
- Calibrate routinely and verify against references
- Place sensors away from vents and doors
- Use a simple log to track drift and maintenance