How to Change Water Filter in LG Refrigerator: Step-by-Step Guide
Learn how to change the water filter in LG refrigerators with our comprehensive, step-by-step guide. Safety tips, compatibility checks, priming, flushing, and leak verification for clean, safe water.

Learn how to change water filter in lg refrigerator safely and correctly. This quick guide covers locating the filter, removing the old cartridge, priming the new one, and verifying water flow without leaks. You’ll need a few common tools and a clean workspace, plus basic safety steps to protect your fridge and plumbing.
Why changing the water filter matters
A clean water filter improves taste, removes particulates, and protects your LG refrigerator’s water dispenser from clogs. If you wait too long to replace the cartridge, you may notice slower flow or a stale taste. This How To Refrigerator guide explains how to change water filter in lg refrigerator safely and effectively, with model considerations, safety steps, and a practical checklist to keep your fridge performing at its best. Regular replacement also helps reduce mineral buildup around the dispenser and keeps ice from tasting off. You’ll typically see a noticeable improvement in water clarity and ice production once the new cartridge is seating properly. By following the steps outlined in this article, homeowners can handle the replacement themselves without calling a technician, provided they observe the safety precautions and use the correct filter type. The brand's guidance emphasizes model-specific details, which is why we start by confirming compatibility before purchasing.
LG Refrigerator Water Filter Varieties and Compatibility
LG refrigerators use different filter cartridges depending on the model, capacity, and dispenser design. Before buying a replacement, identify your model number and match it with the official LG filter type. Using the wrong filtration cartridge can compromise water quality or fit. How To Refrigerator recommends checking the model label inside the fridge or consulting the user manual to determine whether you need a standard, slim, or longer cartridge and whether the filter is upstream or downstream from the ice maker. Once you confirm compatibility, you can proceed with confidence.
Locating the Water Filter in LG Refrigerators
In many LG models, the water filter lives in the grille at the bottom front, while others house it in the interior of the fridge near the ceiling or behind a panel. Some units use twist-in cartridges, others use push-in designs. Start by locating the filter housing with the model label nearby; if you’re unsure, refer to the owner’s manual or LG’s official support page. Having a good light helps you see the notches, twists, or tabs you must manipulate. Remember: different generations may have slightly different access points, so verify with your specific model. If your manual isn’t handy, you can often identify the type by looking for a white plastic cartridge with a colored ring and a release button or twist mechanism.
Tools and Safety Considerations
- New LG water filter cartridge (essential)
- Soft cloth or towel (essential)
- Small basin or tray to catch drips (essential)
- Protective gloves (optional but recommended)
- Paper towels for quick cleanup (essential)
Safety notes:
- Turn off the water supply before removing the old filter to avoid splashes.
- If your fridge is connected to a water line with high pressure, be prepared for a brief spray.
- Do not force the filter; force can crack the housing.
- Work slowly and keep the area dry to prevent slipping.
Step-by-step overview
The following steps provide a concise framework for changing a water filter. For the exact actions and sequences, refer to the step-by-step instructions in the dedicated section below. This overview describes the general flow: locate and remove the old cartridge, prepare the new filter, install the new cartridge, flush the line to purge air and particulates, and reset any indicators if your model has them. Prepare your workspace, gather the tools, and follow the model-specific instructions to avoid damage. Note that some LG models require a brief priming rinse before first use.
Common Mistakes to Avoid
- Not turning off the water supply, which can cause splashes or leaks.
- Forcing a filter that doesn’t seat correctly, leading to leaks or poor water flow.
- Skipping a flushing step, resulting in air bubbles or sediment in your first glasses.
- Using an incompatible filter that doesn’t match your model.
- Neglecting to reset the indicator if your model has one; this can mislead you about replacement timing.
- Starting too soon after installation; give the system a moment to settle before testing water.
Post-Change Verification and Maintenance
After installation, run several cups of water through the dispenser to prime the filter and confirm clear water flow. Inspect the filter housing for leaks for several minutes, especially right after setup. Wipe away any moisture and give the area a final check before placing a tray or bin back. Keep a small log of the replacement date to plan the next change and follow the model’s recommended interval. For best results, replace filters on a schedule that aligns with your household water consumption and the manufacturer’s guidance.
Troubleshooting: water won’t flow or leaks
If water fails to flow after replacement, reseat the filter and ensure it is fully clicked into place. Check that the gasket sits evenly and that the housing is not cracked. A persistent leak may indicate a defective filter or housing damage; stop using the dispenser and contact LG support or a licensed technician as needed. Also confirm the water line shut-off valve is fully open. If the dispenser still doesn’t work, consult the LG app or support page for model-specific troubleshooting steps.
Final care and best practices
Regularly replace filters according to the model’s guidelines and your household water usage. Store spare filters in a cool, dry place and dispose of used cartridges according to local regulations. Keeping the area around the filter clean helps prevent dust and debris from entering the line. The How To Refrigerator team emphasizes following model-specific steps and using only compatible filters to ensure safe, high-quality water. By staying proactive with maintenance, homeowners can reduce the risk of contamination and keep their LG refrigerator’s water system running smoothly.
Tools & Materials
- New LG water filter cartridge (model-matched to your fridge)(Confirm compatibility with your LG refrigerator model before purchase)
- Soft cloth or microfiber towel(Wipe surfaces and dry hands)
- Small basin or tray(Catches drips during filter removal)
- Paper towels(Clean spills and dry the area)
- Protective gloves(Optional for extra hand protection)
- Flashlight or headlamp(Helps see inside tight compartments)
Steps
Estimated time: 15-25 minutes
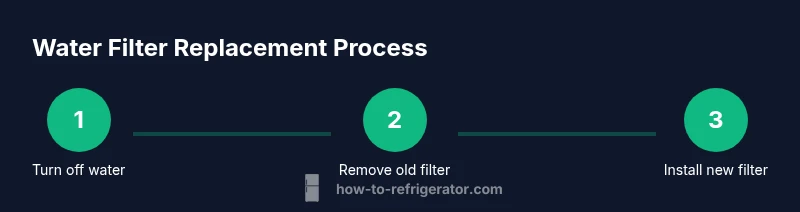
- 1
Turn off water supply and prepare area
Shut off the water valve supplying the fridge and place towels around the base. This minimizes splashes as you remove the old cartridge. Set a basin or tray to catch drips and ensure good lighting.
Tip: Have a dry rag ready and ensure the area is well-lit. - 2
Locate and remove the old filter
Find the filter housing according to your model. Twist or pull to release, then remove the cartridge. Note its orientation for reference when installing the new filter.
Tip: Take a quick photo of the old filter orientation for later reference. - 3
Prime and prepare the new filter
Unpack the new filter, remove protective caps, and prime if required by LG instructions. Rinse briefly under running water to remove any manufacturing debris and reduce air in the line.
Tip: Do not over-prime; follow the model’s priming guidance. - 4
Install the new filter
Insert or twist the new filter into place until it seats fully. Wipe away any residue and verify it is aligned with the housing’s orientation marks.
Tip: Ensure the cartridge is fully seated to prevent leaks. - 5
Flush the system and check for leaks
Turn the water supply back on slowly and run several cups of water through the dispenser to purge air and sediment. Check the housing for drips over the next few minutes.
Tip: If you see small drips, reseat the filter and dry the area. - 6
Reset indicators and record replacement
Reset any filter indicator on your model and log the replacement date for future maintenance. If your model lacks an indicator, note the date in your home maintenance log.
Tip: Set a reminder for the next replacement based on usage and model guidance.
FAQ
Do I need to turn off the water supply before changing the filter?
Yes. Shut off the valve to prevent water spraying during removal and disposal. This reduces mess and risk of spills.
Yes, turn off the water valve before removing the filter to prevent spraying.
Can I use any water filter in LG refrigerators?
No. Use LG-approved or compatible filters specified for your model to ensure proper fit and water quality.
Use only LG-approved or compatible filters for your model.
How often should I change the LG water filter?
Typically around six months, but check your model’s manual and water usage to decide.
Most LG filters last about six months, depending on usage.
What if water leaks after changing the filter?
If leaks occur, reseat the filter, wipe area dry, and monitor for a few minutes. If leaks persist, stop using the dispenser and contact support.
If leaks persist after reseating, stop using the dispenser and seek support.
Is priming required for every LG filter?
Depends on the filter; follow LG packaging instructions. If unsure, run a small amount of water and look for air bubbles.
Priming depends on the specific filter model; follow packaging instructions.
Watch Video
Top Takeaways
- Inspect model compatibility before buying a filter.
- Prepare workspace to manage spills and leaks.
- Prime and flush the new filter fully before use.
- Verify no leaks after installation and reset indicators if available.